Monday, March 30, 2009

Flank Steak Dinner

Matt is definitely a meat and potatoes kind of guy, so when we have people over for dinner, he leaps at the chance to have steak and potatoes. Saturday night was no exception-- so I whipped up some flank steak, yummmm

What You Need:
1/2C Extra Virgin Olive Oil
1C Worcestershire Sauce
1C Soy Sauce
1/4C packed Brown Sugar
1/4teaspoon Salt
2teaspoons Garlic, minced
1/4teaspoons Onion Powder
1/4teaspoons Ground Ginger
2teaspoons Fresh Ginger, shredded
Flank Steak
Combine everything in a mixing bowl and whisk until incorporated. Pour marinade into plastic bag and add flank steak.Put in fridge over night, flipping over the next morning. Get it out of the fridge and bring it to room temperature before you cook it.There are two ways you can cook flank steak... on the grill or in the oven. Saturday, I chose the oven, since, of course, we live in an apartment and it's against fire code to even HAVE a grill. Oh well... the oven will do fine. For medium rare meat you will BROIL the steak for 7 minutes on one side, flip, and broil for another 6 minutes. Slice it thin.I just steamed some broccoli and mashed some potatoes to go with the steak. I also added some bacon to the potatoes. Can't go wrong with bacon

**notice all the space between each thing on my plate... I hate my food touching-- even at the expense of a good photograph.

Sunday, March 29, 2009

FOLK ART!!! Yarn Painting

The High Museum of Art in Atlanta has a fairly good Folk Art collection (not as good as the American Folk Art Museum in NY), but none the less, it's a good resource, so I took my students to the High to learn about Folk Art. Most of my students are scared of drawing, so I try to incorporate drawing into projects that I know they will be successful at (and limit the amount of projects that are solely drawing).

Folk Art is traditionally made by novice artists that make art for the sake of art-- not necessarily to make a profit, though folk art can be profitable. The common "folk" who create such work don't usually follow art movements, but rather, have more of a craft style about them. Also, most folk art is created to tell a story-- such as family quilts and they tend to use materials commonly found around them.

As such, the project I have for my students is a yarn painting. Students are instructed to come up with a simple design that tells a story about them. The design really needs to be rather simple since they will be "painting" it with yarn and very small details can be lost. So let's get started.What You Need:
Yarn, varying colors
Pencil
White Glue
Toothpick
Heavy Paper (I used tag board)
Ruler
1. Draw a 1 in. border around your paper (that way you can mat it when you are done)
2. Draw your design-- I chose a tree3. Lay a strip of glue where you intend to put the yarn, but don't cover the entire area with glue at one time, just one strip of glue will do.4. Lay the yarn on top of the strand of glue, use a toothpick to scwunch the yarn right up against the previous yarn. Once the yarn is in place, cut off the excess-- notice the edges of the painting.5. Try to change up the color of the yarn i.e. 4 different colors of blue for the sky, 2 different colors of green for the grass, 4 different browns to illustrate texture of the tree trunk and reds, oranges, and yellows for the fall leaves-- makes it more interesting.

That's it... enjoy.

Saturday, March 28, 2009

Oreo Brownie Cupcakes


Last year we had a pot luck at work and one of my administrators, who is an avid baker, brought in the most delicious brownies-- brownies with a twist! I have been wanting to bake these for Matt forever! Anyone who knows Matt, knows that he has a HUGE weakness for brownies and double stuffed Oreos. So I took Christina's brownie idea and put it into cupcake tins for individual delight.What You'll Need:
Betty Crocker Original Supreme Brownie mix WITH Hershey's Syrup
1/3 C Vegetable oil
Jumbo muffin pan, lined
2 eggs
Oreos (regular or double stuffed)
Hot fudge ice cream topping
1/3 cup water

Preheat oven to 350 degrees. Follow instructions on back of brownie box (really any brownie mix will do), but you basically mix the eggs, water, oil, mix, and Hershey's syrup together. Then I put 2 Tablespoons of batter in the bottom of each tin and shook the try so that the batter leveled out.Next, place one Oreo in the center of each tin, but don't press it into the batter-- just let it rest on top.Then cover the Oreo with about 1 1/2 Tablespoons of batter. Jiggle the try to even out the batter-- make sure the Oreo is completely covered. (The 2 on the right have a double stuffed Oreo inside, while the other 6 just have regular Oreos)
Bake for about 35 minutes. Insert a toothpick and when it comes out clean, they're done.
While they are STILL hot from the oven, cover with the fudge topping. The jar says to heat the topping first, but since the brownies are still hot, I just used it straight from the jar at room temp.

Ideally, you should then put the brownies in the fridge to let the topping set a little, but Matt couldn't wait (the word "obsession" doesn't quite describe Matt's affinity for warm, baked goods).The lighter brown drop in the middle on top was just a little choc. chip I put on top so that I could tell which ones had double stuffed Oreos in them-- the others don't have chips. Matt loved 'em! Hope you do too!

Thursday, March 26, 2009

Dinner... Baby Steps

Here's the thing... Matt doesn't really like pasta. The hard part is that I grew up in an Italian family, having pasta at least four times a week. So here I am, basically still a newlywed, and the only thing I know how to cook is pasta. Ok, so that's an exageration, but it's still tough. The good news is, however, that Matt is willing to TRY new things. So when I found this recipe in Real Simple Magazine, the best magatize out there, I thought Matt might like it-- I mean, it has bacon, the candy of meats!

What You'll Need:
1 1/4lb. shrimp
1/2 cup white wine
3/4 cup heavy cream
1 1/2 cup frozen corn kernels
1white onion, chopped
whole wheat angel hair pasta
1 Tablespoon garlic, minced
1 Tablespoon olive oil
BACON

Throw some bacon in a skillet and cook until crispy-- flipping occasionally.

Once the bacon is done, drain and place on paper towels to cool. Clean out the skillet and heat the olive oil and dump in the onion, stirring occasionally.
When the onions are soft, pour in the wine and cook until reduced by half. Then pour in the cream and bring to a boil. Add the garlic, corn, and shrimp. While that's cooking, boil some water and cook the angel hair pasta. Once the shrimp is cooked all the way through (should be curled and pink), stir in the crumbled bacon.
Serve shrimp mixture over the pasta.
Matt liked it, but didn't loooooove it. Baby steps.

Wednesday, March 25, 2009

Artist Trading Cards


I went to an in-service in Feb. and we made Artist Trading Cards. I have since fallen in love with the things and can't stop making them. Basically, an Artist Trading Card is like a calling card, business card, or... trading card for artists. It's a way to get our work out there and meet fellow artists. So let's get started...


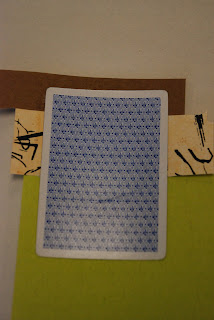
You'll need.... Scissors, glue stick, colored paper for background, tissue paper, lace, ribbon, doilies, clip art images-- you can search Google images and save them in Word or you can sign up for free clip art from Dover Designs, paint pens, Sharpies, watercolors, colored pencils.. you get the point. DON'T FORGET YOUR PLAYING CARD!!!


Next, choose your theme and colors. I chose Creepy Crawlers with brown, green*, and red* paper. The images are from Dover Designs and the paper is actually from a pack of decorative papers I bought at Dick Blick a while ago for cheap.

*Green and Red are complementary colors-- directly across from each other on the color wheel and when placed together, they make the other stand out... they complement each other.


Arrange your background papers. I tore the green to make it a little more interesting. Make sure you glue the card and place your paper on the glued card instead of trying to cut paper to fit-- you can always trim the edges once everything is glued down.


I placed a red strip towards the bottom to balance out the brown at the top, keeping in mind the Rule of Thirds


When you are cutting out your images, make sure you cut as much of the original background out as you can. Then feel free to embellish with other papers, pens, paint, etc. Just work with it until you think it's "done."


Now you have to flip it over and cover the back with a swatch that will be easy to write your info on... so people can look you up! I added a little dragonfly flair!


You can add whatever info you want, but your name is pretty much a must have. I like adding the year and an email .... or blog!! I can't wait to see all of yours-- check these others out

Tuesday, March 24, 2009

DELUMMY!!

I love salsa, and lucky for me, Matt loves my salsa... so here it is, and it's Delummy (a mix between delicious and yummy)

WHAT YOU'LL NEED:

10 Roma Tomatoes
1/2 Cup Onions
6 slices jalapeno peppers (jarred kind is a-okay)
1/4 Cup Cilantro paste
1 Tablespoon Lime Juice
2 Tablespoons Orange Juice
1 Tablespoon (or more if you like) Garlic
Dash of Tabasco Sauce
Dash of Salt
Handful of chopped fresh Culantro*


*Culantro is a flat leaf cousin to cilantro. It's a little more potent, but can be used interchangeably with cilantro.

We stumbled upon it when I asked Matt to get some cilantro at the grocery... he came back with a pack of culantro--I did some research before I used it. Turns out, I like it more than cilantro!


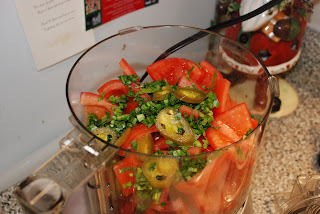
Chunk the tomatoes, core them, and place them in the 2nd greatest kitchen appliance, the FOOD PROCESSOR (a Kitchen Aid stand mixer being #1)

Now dump (technical term) everything else in the food processor...

yes, this is cilantro paste, which you can find in the produce section next to the pre-cut onions (which I also use... who needs to cry over salsa--not me!) I'm sure my mom is cringing right now at the thought of cilantro paste, but it really is good... and I still used fresh culantro.


Viola! Delummy Salsa.... good luck with your own.

Monday, March 23, 2009

Here We Go!!!

Okay... so let's get things started!

Matt and I are officially "bloggers." Of course when I say, "Matt and I," I really mean, "I am officially blogging and Matt will occasionally have some in-put."


I am hoping that this will be something that I keep up with because my sister, Tracy, is right... this is a great way to document and I will want to look back and see what was what in our lives.

But first things first. My friend, Amanda-- whom I still call Ram (her maiden name is Ramsden and that's how I met her... as Ram. Plus calling her Jome is lame.)-- just started blogging as well, so I guess we are sisters in arms in this whole blogging thing. She couldn't decide on a name for her blog so she had her family and friends vote. Since I am not incredibly creative on the spot, I am going to take her idea and have you all vote... so check out which name below you like the best for the title of our blog (Matt has a favorite already).

I hope you enjoy reading this incredibly random, but mostly about us and Art, blog. Become a sheep and follow along!